After setting up your nodes you have to install the thermostat app. Grab that old Android device that is catching dust in a drawer and let us convert it into a Wifi Smart Thermostat.
Download and install the app
First, download the Smart Thermostat app from the play store:

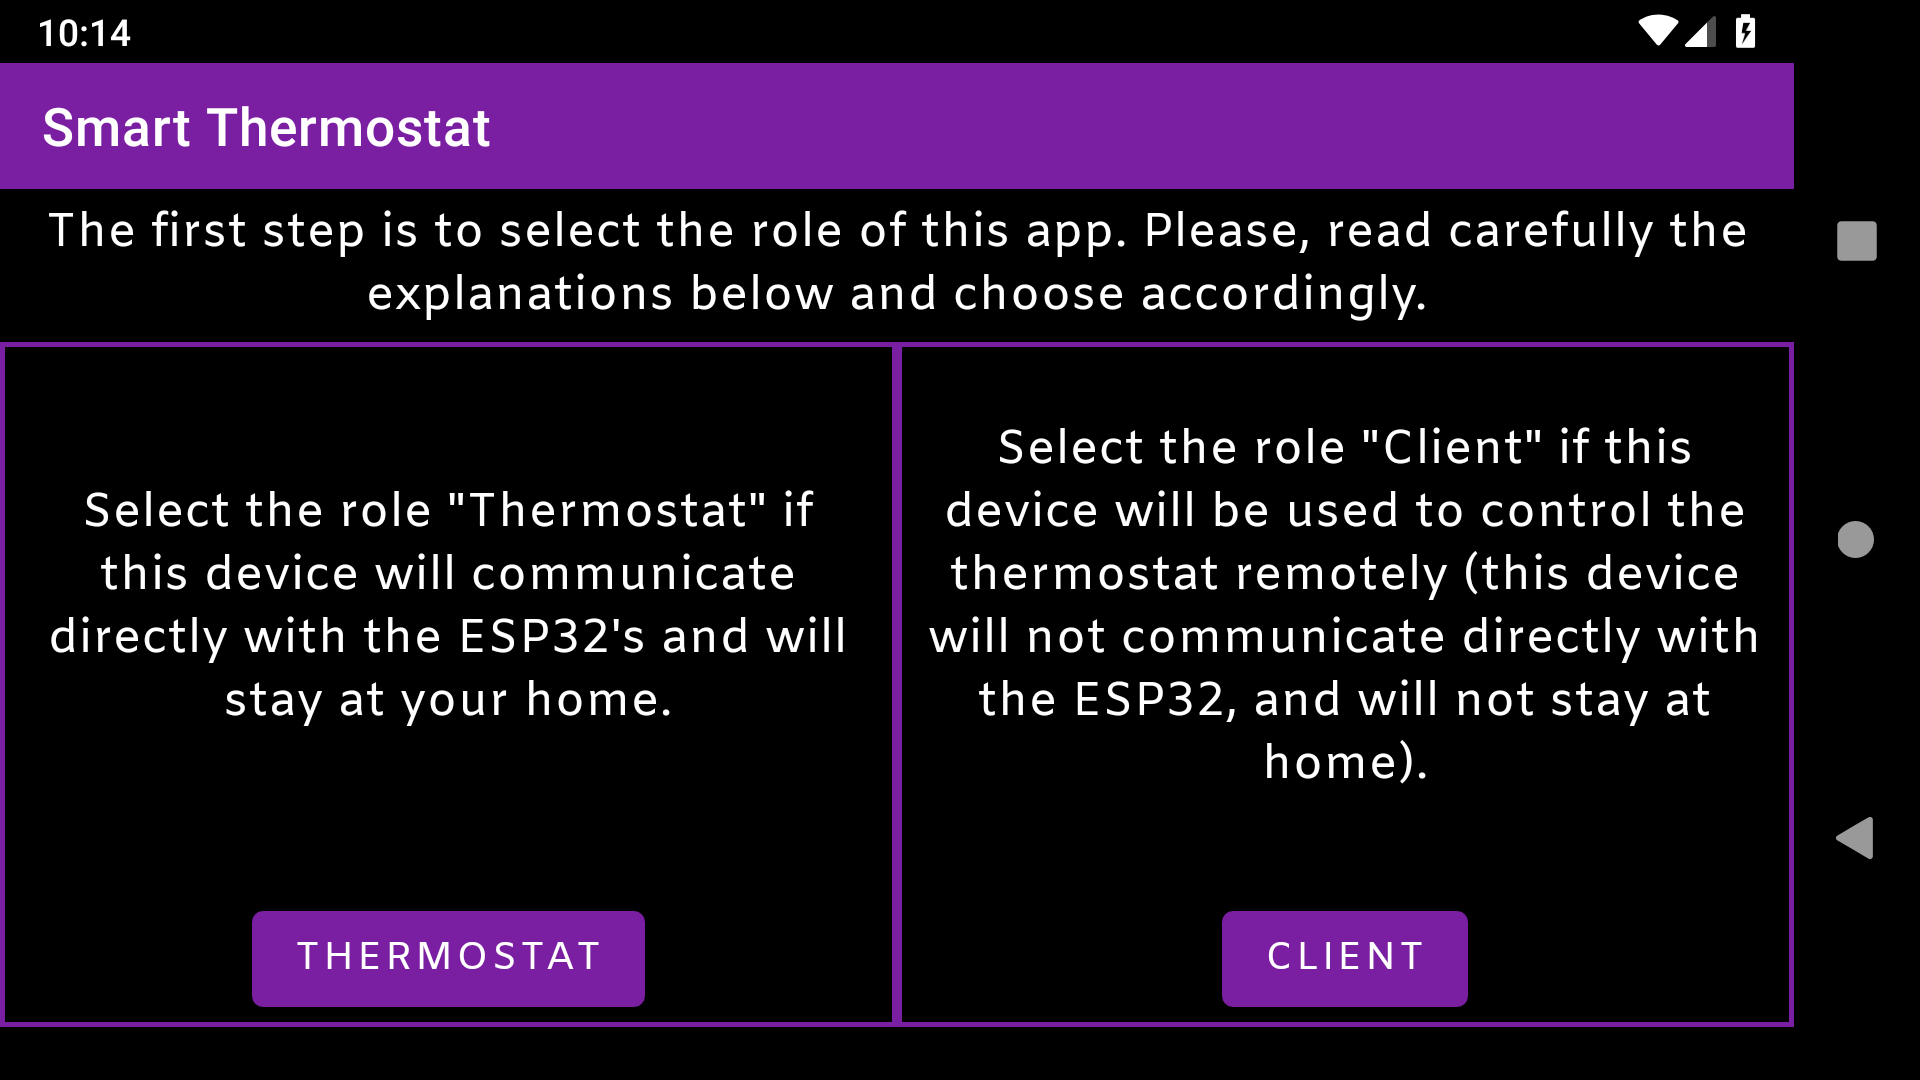
Start the app and select the role
Start the installed app, and you will be lead to the following screen where you have to select the role for the current app. We are setting up the thermostat, because of that please select the “Thermostat” role.
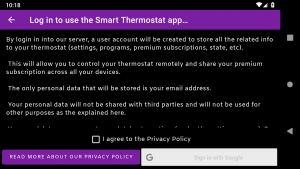
Login with our server
After selecting the role “Thermostat”, you will be lead in the login screen. Please read carefully the summary of the privacy policy. It is not a bad idea to read the complete privacy policy too.
Why do you have to login to use the app?
The thermostat app needs to login with our server to store your configuration, and share the data with the client apps that you probably will use to control the thermostat remotely. That means that our server will act as bridge between your thermostat app, and the client apps that will control the thermostat app. And to identify which user is doing what on which thermostat, we need you to login.
Besides of that, many features of the thermostat (some not developed yet, but planned) rely on the server, for example, the alarms features, the graphics with the use of the termostat and so on.
The only personal information that will be store is your email address, and as explained in the privacy policy, it will not used for other purpose as the explained here, now will be shared with third parties.
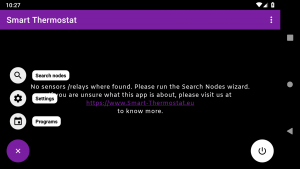
Discover the nodes present in your WLAN
After login in, you will see the following screen, informing you that no nodes were detected and that you have to use the Node Search Wizard to discover them. Please select the option “search nodes” on the left menu, and allow the app to discover them (assuming you have configured all the nodes that you want and they are working well).
The search nodes wizard will scan your WLAN and report all the found nodes. This can take a while. After the search is finished, you will see a list of discovered nodes, like the following:
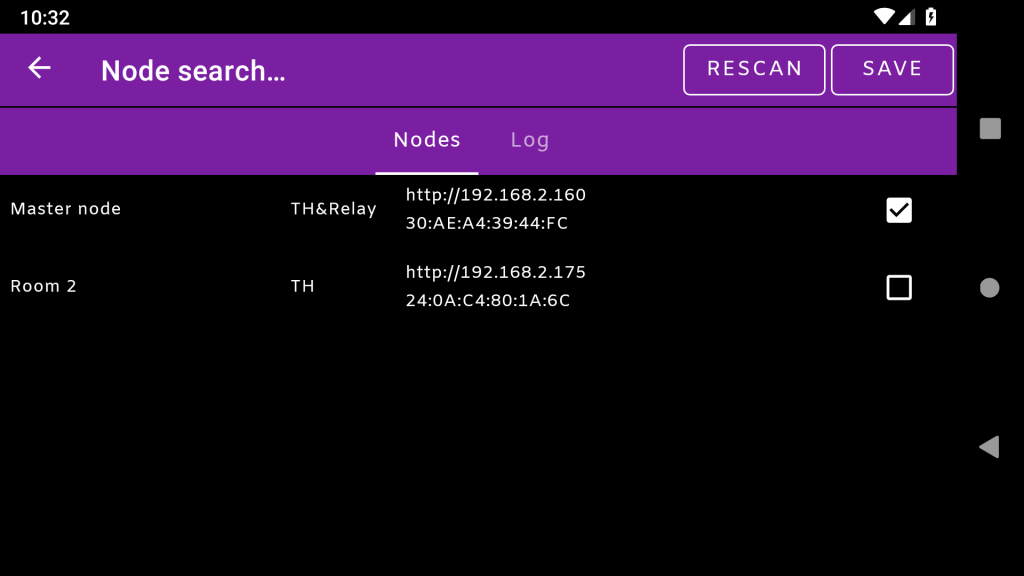
In the case that the wizard does not find any nodes, you can use the “Log” tab to obtain more details with what happened. Please, check the entry corresponding with the IP address of your node, to see the error message. If you are not able to solve the issue yourself, ask in our support forum.
In the image above, the wizard found two nodes:
- a node named “Master node”, which is a hybrid node (relay and temperature sensor connected to the same MCU).
- and one additional temperature node called “room 2”
You have to decide which node is the “Master node” and check the box according to it.
What is a master node?
The master node is the node used to obtain the reference temperature to control your boiler. In the example above, the thermostat will use the temperature recorded by the node named “Master node” to decide when to start/stop your boiler. You could select as master node the node “Room 2”.
As we already explained, you can have as many temperature nodes as you want, but you must have one, and only one relay node.
Please select your master node, and press “Save”. Your configuration will be saved, and the thermostat service will be started.
The thermostat main screen
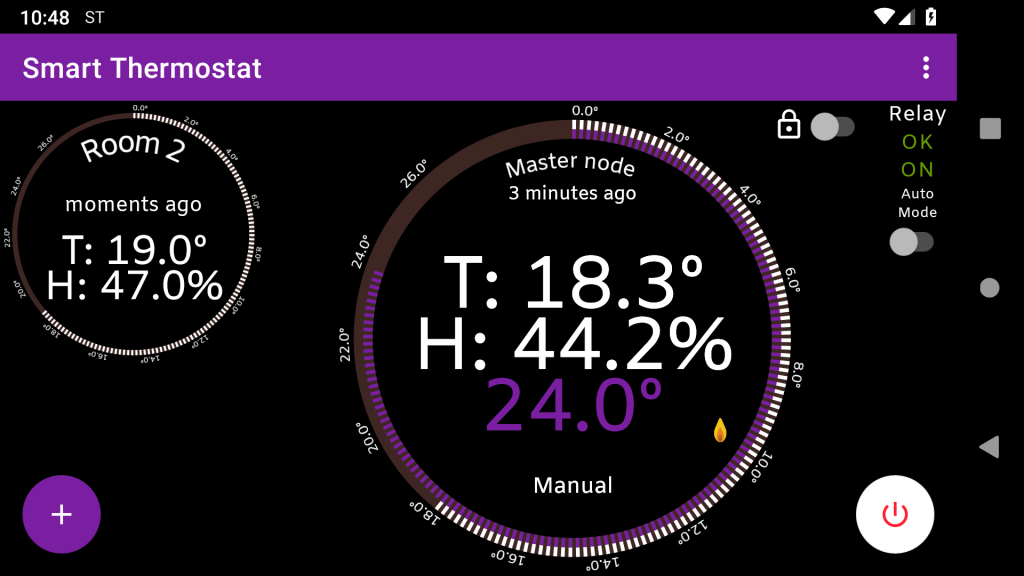
The main screen is organized in the following sections:
- The big circle in the center represents your master node. The current temperature in the room where the master node is located is displayed on the upper half of the big circle (T:18.3º). The humidity is displayed below the temperature (H:44.2%). And below the humidity you can see the current user’s desired temperature (24º).
- The word “Manual” or “Auto Mode” indicates if the thermostat is currently working in manual mode or auto mode
What are the manual and auto mode?
You could setup multiple programs, where you can specify the desired temperature for each moment of the day, and then let the thermostat work unattended, in auto mode. For example, you could set up a program to heat your home only in those periods when you are at home. Or only at the weekends. It depend on your need.
Or you can turn off the thermostat manually yourself, and set up the desired temperature manually. That means that the thermostat is not working in auto mode anymore, and you have to remember to turn it on/off when needed, and to adjust the desired temperature.
Off course the thermostat will maintain the desired temperature of the user, when working in manual mode too 😉
To activate/deactivate the auto mode, use the switch called “auto mode”.
- On the right, you have a white button, where you can power on or off the thermostat. This button is only available when working in manual mode because in auto mode the selected program will decide when the heating is turned on/off.
- You could see a flame inside the main circle, in the case the thermostat is demanding heat from the boiler at this moment (the thermostat is in the heating state). When the desired temperature is reached, the thermostat enters in the “cool-down state”, and waits until the temperature drops a little (this is configurable) before demanding heat again.
- On the left, you will see a list with the other nodes present in your setup if any.
- On the right, you have information about the state of the relay that is connected to your boiler. In this case, the relay is working well (status OK) and is ON (it is demanding heat from the boiler).
How to adjust the desired temperature.
To adjust the desired temperature
- Unlock the main node by clicking on the switch button that has a lock in the nearby. The thermostat enters the edit mode.
- Slide your finger over the circumference/margin of the circle to set the desired temperature, or
- Tap on the upper half of the circle to increase the temperature and on the lower half of the circle to decrease the temperature.
- When finished, lock again the master node using the switch, and the new desired temperature will be applied.
The settings screen
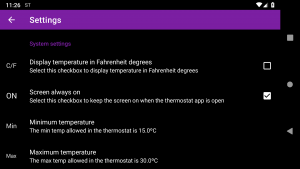
Here you can customize many settings of your thermostat and how it works.
Thermostat settings
- Show the temperatures in Fahrenheit: you may wish to show the temperature in Fahrenheit degrees. Please select the checkbox in that case.
- Minimum temperature: this is the minimum desired temperature that a user can select for the thermostat.
- Maximum temperature: the maximum desired temperature selectable.
- Hysteresis: with the hysteresis value you can control how the thermostat demands heat from the boiler. Imagine that you set a value of 2º for the hysteresis and a value of 20º for the desired temperature. That means that the thermostat will not demand heat from the boiler until the temperature in the room reaches the lower limit, that is, 18º. At this moment, the thermostat will turn the relay on, and the boiler will start to produce heat until the temperature in the room reaches the higher limit of 22º. And then it will stop and wait until the temperature falls to 18º. You can modify
- Calibration: here you can introduce a value (for example, 0.5º), and this value will be applied to the temperature registered by the temperature sensor. This can be useful if you know that the temperature sensor is reading to high (or to low) values.
“Temperature not increasing” alarm.
With these settings you can configure what happens if the thermostat is demanding heat from the boiler, but the temperature registered by the master sensor does not increase. This alarm could be useful to detect a malfunction in the relay node, the master node, o for example, that someone has leaven a window open while the boiler is heating.
- Enabled: Check this box to enable or disable the alarm.
- How much should the temperature increase? Introduce here the number of degrees that the temperature should increase. For example, 3º
- Interval in minutes: the interval of time where the temperature should increase the degrees indicated above.
- Turn of boiler: activate this checkbox if you want your boiler to be powered off if the alarm is triggered.
With the configuration above, if the thermostat is demanding heat from the boiler, and in a period from 20 minutes, the temperature does not increase at least 3º, then the alarm is triggered.
Privacy settings
- Crash reporting: if the app crashes, then an anonymized report will be sent to us, to help to solve the problem. With these reports we can improve the app. None of the data contained in the report can identify you in any way. If you don’t want to share crash reports with us, then uncheck this option.
- Analytics: the app records some stats of use (for example, how many users the app has, or how many user times the power button is clicked). No personal data is registered, but you can disable this option if you want.
- Personalized Ads: The ad provider for the ads shown in the app, uses information present on your device to show you personalized ads. If you don’t want to receive personalized apps, then uncheck this option. Despite that, you will see ads, but they will not be aligned with your interests.
Delete account
The last option of the settings screen is the “delete account” option. This option will delete absolutely all the information that we store on our server about you:
- Your user account
- The settings for your thermostat
- Your historical data (temperatures, stats of use, etc).
- If you published messages in our support forum, they will be anonymized and your personal data will be removed from them.
- Your purchases of credits will be maintained until the expiration date of the purchase, and then deleted.
This data can not be recovered in any way. Be careful with this option, and make sure that that is what you really want.
The programs screen

Use this screen to create programs to control your thermostat in the “Auto Mode”. You can create as many programs as you wish, but only one program can be active.
As you can see, you can customize the program for each day of the week. This is done by creating periods. On the screen above the Friday is selected, and at this moment for this day, there are two periods configured: one from 00:00 to 11:59, and the other from 12:00 to 23:59 hours.
You can add as many periods as you want, and you can adjust the start and end times of each period. To add new periods click on the split button on a period, and the source period will be divided into two. Then you can adjust the desired temperature for this period by clicking on the temperature field, or you can deactivate this period by clicking on the On/Off toggle button.
Delete a period by clicking on the delete button, and it will be merged with the previous period.
Link client apps with the QR Code screen
Now that you have configured the thermostat, it is time to link a client app. For example, you may wish to control the thermostat when you are at work. To take the thermostat with you is not a good idea, because the thermostat has to stay at home to be able to control the nodes, and therefore, the heating of your home.
But you can install the app on your smartphone, and configure it as a client. Install and start the app, and when asked for the role, select “client”.
You will be lead on an empty screen. The next step is to link the client app with the thermostat. The process is very easy
1.- In the thermostat app, open the screen “Link with QR code”, in the options menu. A QR Code will be displayed. This QR code is only valid a couple of minutes, because of that go ahead with step 2.
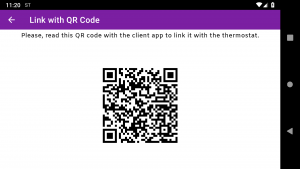
2.- In the client app, press on the button called “Read QR Code”. Your smartphone’s camera will be started. Please read the QR Code with your smartphone, and your smartphone will be linked. The process should take not more than a few seconds. Now you can control your thermostat remotely using the client app.
You can link as many client apps as you wish.
Remove the ads
You can use all the features of the app for free, but unfortunately, you will be disturbed with ads. We have to maintain the server infrastructure and to justify the (countless) hours of development that this project require in some way.
If you are tired from the ads, you can disable them for a period of time by buying credits in the app. For example, you could buy a period of six months without ads, enough to use the app through the winter. Of course, all your linked apps will receive the same credits.
By doing this you help us to maintain or infrastructure and to add new features.
In the future, buying credits will unlock some advanced features (not developed yet, but we are at work).
Security measures of the thermostat
The high-level relay
In the first place, by using a “High Level Triggered” relay, in the case that the power cuts on your home, then the relay changes to status open. That means, if for some reason the power is cut to the relay, then the boiler is stopped.
The relay node
The relay node should receive commands from the thermostat periodically. If the relay node does not receive a command from the thermostat in a couple of minutes, then it could be that the thermostat has crashed in any way. In this case, the boiler is stopped, until the problem is solved.
The master node
If for some reason the master node used to read the temperature is not reachable, can not read the temperature, or enters in an error mode, then the boiler is stopped, until the problem is solved.
Without Wifi connectivity
The thermostat continues to work if your Android device loses connectivity with the internet or our server. In this case, the thermostat will continue to work with the last command or program received.
Of course, you will not be able to control your thermostat remotely with the client app, until the connectivity is restored.